

Dec
HOW TO MAKE A MUSHROOM SPORE PRINT
Learning how to make a mushroom spore print is an essential skill for any budding mycologist.
If you’re interested in foraging for wild mushrooms, spore printing can help identify exactly what mushroom you’ve found.
If instead, you’re interested in growing mushrooms from spores, you need to know how to properly collect and store the spores to complete the mushroom life cycle. mushroom spore syringe
Either way, the spore printing process is basically the same.
WHAT ARE SPORES?
Although not technically accurate, mushroom spores can be thought of as “seeds”, with each spore containing exactly half of the genetic information required to produce an actual mushroom.
The spores are released into the environment from the gills (or pores) located under the cap of a mature mushroom. They then get carried away by air currents, and if they land in the right place, will eventually produce fine white strands of mycelium.
The mycelium will grow and eventually produce a new mushroom fruiting body, starting the cycle all over again. mushroom spore syringe
Spores come in all different shapes, colors and sizes depending on the species- they really are amazing! And to think that a single mushroom can release billions of spores into the air. mushroom spore syringe.
That being said, the only factor visible to the human eye is the spore color, which is why taking a proper spore print is such an important characteristic for identifying mushrooms.
HOW TO MAKE A MUSHROOM SPORE PRINT
The process for making a spore print is pretty simple.
Basically, you just need to allow spores to fall from the cap of a mature mushroom and onto a piece of paper, tinfoil or glass.
This method below works well for both gilled mushrooms and mushrooms with pores. mushroom spore syringe
What You’ll Need
1. A Mushroom Fruiting Body
2. Printer Paper (white or black), tinfoil, or glass
3. A drinking glass or a bowl to cover the mushroom cap
4. A Ziploc bag for storing. mushroom spore syringe
A fun, easy, and educational activity
Autumn is a great time to go mushroom hunting with the arrival of the season’s rain showers. If you’re keen to identify those species you find, it’s helpful to know the color of their spores.
If you would love to learn to identify and even possibly consume wild mushrooms, then making a print in order to determine their spore color is an essential activity to complete. Making spore prints is rewarding to do with kids and some prints are even pretty enough to frame! magic mushroom spore syringe

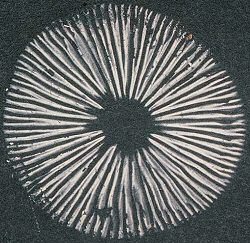
White spores on black paper
Spores are the reproductive structures of all mushrooms and can be any color, including white, cream, yellow, green, purple, brown, rust or black. They are produced by the gills and released from them by the millions when the mushroom is mature. They are then blown away by the wind and settle in a new location to begin a new generation in the life cycle of the mushroom.
STEP 1: CHOOSE A MUSHROOM
Mushroom spores aren’t produced until near the end of the mushroom life cycle, so try and find a mushroom that is mature in age.
When young, many mushrooms will even have a “veil” covering the gills and protecting them as the mushroom develops. If you try and take a spore print of these young mushrooms, it’s very likely that no spores will fall. mushroom spore syringe
STEP 2: REMOVE THE CAP
To make spore printing easier, carefully remove the cap of the mushroom from the stem at the highest possible point. Again, if you have a shelf mushroom or an oyster-type mushroom you might just be able to use the whole thing to make the print. magic mushroom kit
STEP 3: PLACE THE CAP DOWN
Lay the cap of the mushroom with the gills upside down onto a piece of paper. For the majority of specimens, a normal sheet of white paper works fine.
However, some mushrooms have white spores- so if you are taking prints for the purposes of identification, you might want to consider also getting some black paper.
If you’re planning on growing out the mushrooms from spores, it’s better to make the print on tinfoil. Not only is tinfoil more sterile (you can wipe it down with alcohol), it’s also better for making spore syringes and scraping spores on to agar plates.
STEP 4 – COVER WITH GLASS AND WAIT
You want the spores to fall directly down onto the paper from the mushroom cap. To do this, cover the cap with a glass or small bowl which will prevent air currents from carrying away your spores.
After 6-12 hours, remove the cap. You should have a fully formed mushroom spore print. mushroom spore syringe
To store the prints, fold over some of the paper or tin foil and store them in a ziploc bag. Spore prints can be stored anywhere at room temperature, and can last decades. mushroom spore syringe .
There is no need whatsoever to refrigerate the spore print, even if you are planning to use the spores for cultivation later down the road.
Thank you very much for sharing. Your article was very helpful for me to build a paper on gate.io. After reading your article, I think the idea is very good and the creative techniques are also very innovative. However, I have some different opinions, and I will continue to follow your reply.
Fantastic blog post.Thanks Again. Will read on…